Monday, February 28, 2011

Dishwasher Magnet

This little magnet is a great solution for your dishwasher to let your family know if the dishes inside are clean or dirty.  Just flip the magnet accordingly.

Materials:
A Magnet
Computer/Printer
PowerPoint Knowledge
Scanner (Optional)
Paper
Scissors
Laminating Machine
Lamination Pouches
Double-Sided Adhesive Tape


Directions:
Prepare the magnet using PowerPoint on your computer.  Since I used a 2" x 3-1/2"  promotional magnet from our fridge, I made a 2" x 3-1/2" box on the page and put a line halfway through it.  Make two text boxes and picked your favorite fonts for "Clean" and "Dirty" and add a shadow.  Flip one around using the green rotating lever attached to the text box.  Now, you can use a background that you have stored on your computer or scan paper/material that has a design that you like.  Shrink or crop it down to fit in each box and send the image to the back.

When you are happy with the design of your magnet, print it and cut it out.  Place it in a lamination pouch and send it through your lamination machine.  Cut again along the outline and adhere it to your magnet using double-sided tape.

Leave a comment telling me what other projects you would like to see on Mary's Makings and be a "follower" of the blog and I will send you one of these magnets!


Sunday, February 27, 2011

Personalized Peels


It is Sunday evening... how many of you are packing lunches for your loved-ones? Anyone packing a banana in that lunch bag? This is a simple idea, but such a good one.

Send a message by writing on the peel of a banana with a pencil. Use pressure in order to make your message slowly appear.  By morning, your writing will be bold.

Write messages of sweet-nothings to warm their heart and yours. Or, use this as a clever way to send a reminder.

Credit for this idea goes to a long-time friend, Jordan, and her parents.  They were the type of family that you were lucky to spend your days (and many nights) with as you grew up.  


Let's Hear From You!
What do you want from Mary's Makings?  What are you working on?  Are you stuck on a project?  Would you like to be a guest blogger?  Comment anytime!

Saturday, February 26, 2011

Fuzzy Little Ducking


Have you tried needle felting wool?  Its like sculpting with wool roving (wool that hasn't been spun into yarn).  Even though the barbed needle is very scary and can go right through your finger you have a lot of control over the placement of the fibers.

Felting Needles, Tool and Foam
Materials:
White Styrofoam Ball
Yellow Roving
Orange Roving
Black Wool Yarn or Roving
Felting Needle 
Needle Felting Tool
Piece of Foam


Directions:
Cut your foam ball in half.  Take one piece and cover it with yellow roving.  Secure it in place by punching it with your needle felting tool.  Watch your fingers!

After there is no foam showing, roll a piece of yellow roving and begin to form a ball with the needle felting tool. Do not over felt this ball - it is okay to have the roving a little loose.  To make the head larger or a different shape, add more roving and continue to punch it in place.

Set this ball where you want the head to be and attach it by stabbing your felting needle around the base of the ball into the Styrofoam body.

Make two wings by shaping the yellow roving on the foam block.  Once you like the shape of the wings place them on the back of your duck and attach them with your felting tool.

Next, sculpt a bill by shaping the orange roving on the foam block into an oval shape.  Then, fold the oval in half and needle felt the bottom of one side together as shown.

Form an Oval
Fold and Needle Felt Bottom of One Side

Attach the bill to the duck by stabbing the end of the bill to the duck's face.  (Sounds brutal doesn't it?)  If you have black roving , attach two small pieces just above the bill.  Or, you can make two knots out of black wool yarn, cut the ends and needle felt the knots in place for the eyes.

Congratulations, you have just created a little fuzzy ducking!

If you would like to purchase this duck, it is confused and is migrating up the North Shore to Sweat Peas in Two Harbors, MN tomorrow morning.  You can catch his flock there or on my Etsy site, www.etsy.com/shop/marysmakings.

Giveaway Reminder!

What is the next giveaway?  Tell your friends about Mary's Makings... the 20th person who "follows" will receive the "thankful" scrabble rack from the "Calling All Scrabble Lovers" post (to show that I am thankful for all of you.)  What is in it for you?  If the 20th person tells me that they were referred by you, you will receive the April Showers Bring May Flowers:  Boutique Barrette.  Stay tuned and have fun spreading the word!

Wednesday, February 23, 2011

Quick Coasters... So Simple!

I love the look of felted wool.  If you are like me, you will enjoy today's quick and easy project.  Since this type of  wool will not unravel, there is no sewing involved.

Do you have left overs from making the felted sweater wreath?  If so, skip the "Felting Instructions" and go right to "Coaster Instructions."

Materials:
Felted Wool
Rotary Cutter, Guide and Mat (or Scissors)

Felting Instructions:  
Throw your sweater in your washer along with a tiny bit of mild soap. Set your washer to the hottest water setting. Throw in dryer balls, tennis balls, an old pair of shoes, or an old pair of jeans... anything to create agitation. Let your washer do the work! Stay close during this process to check on the progress of your sweater. Sometimes the process will take 10 minutes and sometimes it  will take 30 minutes (just keep sending your sweater through until the fibers felt together.) Even though your felting should be complete just from the washer alone - you can send your sweater through the dryer so you can get going on this project sooner.

Coaster Instructions:
Cut 4" x 4" squares from your sweater where there are no seams.  If there is a pattern in the sweater and you would like your coasters to match, try to cut your squares where the pattern repeats.  That is it!  Easy schmeasy!


Tuesday, February 22, 2011

April Showers Bring May Flowers: Boutique Barrette

For those of you who are surrounded by gigantic mounds of snow and are teetering on the edge of winter blues... this one is for you.  Whip out your glue gun and make some beautiful bloom barrettes to remind you that spring will come again.

Materials:
Artificial Flowers
Button (or jewel)
Embroidery Floss
Hair Clip
1-.1/2" Scrap of Ribbon
Glue Gun
Scissors

Directions:
When picking your artificial flowers, a variety of types will work.  You don't have to use only one type of flower.  Mixing and matching layers from different colors and varieties will create a more unique look.  Also, don't worry about where you gather your blooms from, you can purchase them from craft, discount or dollar stores.

First, take off the stems from your flowers including the green plastic piece holding the layers of pedals together.  Now your flowers will sit flat and you can layer different flower pedals together.  Tip:  If some of your pedals are too floppy, use spray starch to give them structure.

With your glue gun, attach your flower layers together.  If using a button, sew it on.  If using a jewel, glue it on.  The picture shown includes embroidery floss of coordinating colors tied behind the button.

Glue a 1-1/2" piece of ribbon around the clip with the seam facing the top.  Then put a line of glue on the top of the seam and place the clip on the bottom of the flower.  (See the picture to the left.)

You can use this barrette in your little girl's hair or clip it to a stretchy  headband.  Feeling like you need some color?  Clip this flower to a loosely knit or crocheted bag.

If you would like this clip but don't want to go to the trouble of making it, be the person who refers the 20th "follower" of Mary's Makings.  Or, you will find them for sale if you travel up the North Shore to Two Harbors, MN to the gift shop Sweet Peas.

Happy Crafting!

Monday, February 21, 2011

Celebrate!


Want a festive way to decorate for your next celebration? Here is a fun and easy way to make banners (inspired by one very creative and close friend who throws parties we will never forget... thanks Joolee!)


Materials:
Scraps of Felt or Felt Sheets
Ribbon (Length depends on length of banner)
Sticky Felt Letters
Rotary Cutter and Mat (or Scissors)
Tacky Glue

Directions:
I purchased felt sheets at Michael's and their selection includes printed designs as well as solid colors.  They also carry the felt letters with adhesive on the back.

I made a quick sketch to the left to explain the following paragraph.  I started by cutting the big triangles out of each style of felt at 45 degree angles and a 6 inch height.  Then I cut the small triangles, again using a 45 degree angle, with a 5 inch height.

Peel off the backing on the sticky letters and apply them to the small triangles.  Then glue the small triangles to the big triangles.  You can match up your colors and patterns on the triangles in any pattern you desire.  I tried to be as random as possible with mine.

When the glue dries, cut holes in the top corners of the large triangles and string your ribbon from the front to the back and back out the front again on each triangle.  Tie a 5" piece of ribbon in between each triangle.  This is a perfect way to use up your stash of scrap ribbon.

By the way, you can make this project from paper, too!


CONGRATULATIONS WINNERS!  
Thanks go out to the first 4 people who signed up to follow Mary's Makings!  TR, Joolee, Brianne T and Digs will all be receiving a bookmark featured in the post "Bookmarks that Don't Budge."

What is the next giveaway?  Tell your friends about Mary's Makings... the 20th person who "follows" will receive the "thankful" scrabble rack from yesterday's post (to show that I am thankful for all of you.)  What is in it for you?  If the 20th person tells me that they were referred by you, you will receive tomorrow's project.  Stay tuned and have fun spreading the word!


Sunday, February 20, 2011

Calling All Scrabble Lovers...

Decorating with words, according to HGTV, is a great way enhance the look of your home. Take a look at how easy this little project is...

Materials:
Scrabble Game
Amazing E-6000 Glue

Directions:
A Scrabble rack will hold 9 letters so pick your word accordingly. Center your letters on the rack to determine the correct positioning and glue each letter in place one by one.

Use this fun idea for your home or as a simple gift for a friend. Spell out an inspirational word, a family name, or a new baby's name. Make a nameplate for a teacher's desk, a "welcome" sign for a shelf, or spell "giggle" for a personal reminder.

So, dig out your old scrabble game tonight or keep an eye out for them this summer at the garage sales. Either way, have fun!

Friday, February 18, 2011

Felted Frenzy Wreath

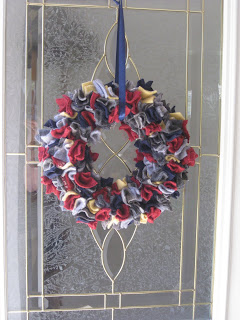
Give an old sweater (or two or three) a new use... welcoming people into your home! This frenzy of texture and color is made with old sweaters that have been felted, cut, and pinned to a foam wreath.

Materials:
Wool Sweater(s)
Washing Machine
Mild Soap (Such as Dawn)
Scissors (or Rotary Cutter and Mat)
Box of Pins
Green Foam Wreath
2' of Ribbon

What is felting?
It is a fancy term for shrinking your wool sweater. However, by doing this you are making the wool fibers cling tightly together which creates an unraveling material.

Picking Your Sweaters:
Make sure your sweater is either 100% wool or a very high percentage of wool. When adding up the "ingredients" on your tag, include angora, mohair, and lambswool in the wool percentage to get your total. I suggest 70% wool or higher.

Instructions:
Throw your sweaters in your washer. If you have different colors, felt them at separately so the wool from one sweater doesn't stick to another. Pour just a tiny bit of mild soap into your washer. Set your washer to the hottest water setting. Throw in dryer balls, tennis balls, an old pair of shoes, or an old pair of jeans... anything to create agitation. Let your washer do the work! Stay close during this process to check on the progress of your sweater(s). Sometimes a sweater will take 10 minutes to felt and others will take 30 minutes (just keep sending them through the wash until the fibers felt together.) Even though your felting should be complete just from the washer alone - you can send your sweater through the dryer so you can get going on this project sooner.

Begin cutting 2" x 2" squares from your sweater(s). You can use a sharp pair of scissors or even a rotary cutter and mat if you have them.

Pick a wreath of any size or shape made of green foam (the white foam isn't compressed enough to hold a pin).

One at a time, fold the squares in half and in half again and place a pin through the outside of the center corner of the square. With the felted square on the pin, place it into the foam. Continue placing the squares relatively close to each other in any color pattern that pleases you.

When all of the green foam has been covered, loop a 2' ribbon through the center of the wreath and knot the ends together to make a hanger.

Hang your wreath and enjoy!

Thursday, February 17, 2011

Bookmarks that Don't Budge

If you are like me, when you lose your spot in a book you spend too much time rereading chapters. Make sure you don't lose your spot with these bookmarks that don't budge.

Bookmark Instructions:
Your local craft store will have hair clips that are covered with ribbon saving you from messing around with your glue gun and receiving minor burns.

Stack two pieces of felt on top of each other. Cut any shape that you desire. (You can free-hand your shapes or print, cut, and trace Microsoft Word's Auto Shapes for templates.)

Add a button or two for embellishment to one of the felt pieces. While placing your button(s), be sure to allow enough room for the following step.

With embroidery floss, stitch around the inside of the shapes knotting the floss at the beginning of your stitching and at the end.

Glue your shape to the clip with a glue-gun (okay, okay... your safety was only guaranteed for a little while... here come the burns) or tacky glue.

Carrot Green Instructions:
Cut a rectangle from green felt that is approximately 1.5"x 3". Make cuts from one side of the rectangle leaving about 1/2" at the bottom that is uncut. Roll up this rectangle and secure all layers by sewing back and forth through the bottom of the greens. This bunch can now sit between the two felt pieces that are cut like carrots. Glue or sew it in place and continue with the steps above. (Notice that the carrot is glued on the clip lower than the other examples shown. This provides stability for the long shape. It will sit further down in the pages of your book.)