Thursday, March 17, 2011

Festive Flowers

Picture Taken by Delora
Does anyone else feel bad mowing over the sweet daisies that grow in your yard?  Here is a fun way to use them for a gift or for a science project.  Did you know that you can color your daisies by putting them in water with food coloring?

Materials:
Daisies
Sharp Scissors
Faucet
Water
Vase
Food Coloring

Instructions:
Round up the daisies that pop up in your yard or purchase some at your florist.  This process will work for carnations, too.

Trim the stems of your flower by making a slanted cut under running water.  Why a slanted cut? Making a flat cut may cause your flower stem to sit flat on the bottom of your vase which won't allow your flower to take in water.  Why cut under water?  Without this step small air bubbles may form at the end of the stem also preventing water intake.

Fill your vase 2/3 of the way with warm water.  Add 25 drops of food coloring per half cup. Place your flowers in the vase and check back every hour.  After one day your petals should be fully colored.  

Scientific Explanation:
Here is About.com's scientific explanation for this process called transpiration (plant drinking).  As water evaporates from flowers and leaves, the attractive force between water molecules, called cohesion, pulls more water along.  Water is pulled up through tiny tubes (xylem) that run up a plant's stem.  Although gravity might want to pull the water back down toward the ground, water sticks to itself and these tubes.  This capillary action keeps water in the xylem in much the same way as water stays in a straw when you suck water through it.  Except evaporation and biochemical reactions provide the initial upward pull.

Good thing you are following this blog!  You are now officially smarter.

Wednesday, March 9, 2011

Signs of Spring

Is anyone else hungry for spring?  Soon we will be turning the clocks forward, dying Easter eggs, and seeing little blades of green grass peek through melting snow patches.  Here is a little project to get our minds moving in this direction.

Materials:
Brown Wool Roving
White Wool Roving
Felting Needle
Sponge

Directions:
Break out your needle felting supplies and begin to create a cup shape by needling your brown wool roving.  Start by making a circle and continue to add more roving while tipping the nest to create the sides.

Next, make each of your eggs by rolling the white wool roving.  Begin to needle felt (stab or strike) the fibers in place.  When finished, place your eggs in the nest.

Quick and simple - yet sweet!

Tuesday, March 8, 2011

Boring to Beautiful


How about this for amazing...  

Sachiko from the blog "Tea Rose Home" shows us how to make a gorgeous ruffled shirt out of two matching t's.  As soon as you try this or another amazing shirt from her blog, let me know and I will post it.  

Next on my shopping list:  
Two Matching T-Shirts!

Friday, March 4, 2011

So In Love: Bride and Groom Chocolate Covered Strawberries

Milk chocolate, almond bark, and strawberries... is your mouth watering like mine is?  This idea adds such an elegant touch to your table when you are hosting a wedding shower.  Although they take a little time and patience, you will thank yourself when you take a bite.

Materials:
Washed Strawberries
Semi-Sweet Chocolate Chips
White Almond Bark
Stove
Pan
Toothpick
White Tulle
Needle
White Thread
Wax Paper
Baking Sheet

Groom Instructions:
Slowly warm 1 row of almond bark squares on the stove in a small pot.  Once the consistency is runny, dip the strawberries by holding on to the stems.  Stop just before you get to the greens. Lay them on wax paper on a baking sheet until the bark hardens.  Set aside the left over bark for the brides.

Slowly warm a 1 cup of chocolate chips on the stove in a small pot.  Once the consistency is runny, dip your strawberries twice - once at an angle on one side of your strawberry and once on the other.  Leave a white triangle in the middle for the front of the shirt.  Once all of the grooms are dipped, take a toothpick and dip it in the chocolate and make two small dots for buttons down the middle of the shirt.  Place them in the fridge until their debut.

Bride Instructions:
If needed, add more bark and warm it once again.  When the consistency is runny, dip the strawberries by holding on to the stems.  Set them on wax paper on a baking sheet and place them in the fridge.

Now make the veils.  Cut 1" x 2" rectangles - one for each of your brides.  With your needle and white thread, gather one of the 1" sides.  Leave 2" of extra thread at each end of this gathering and make a knot.  With the excess thread, attach your veil to the strawberry by knotting it around the stem.  Trim off the extra strands.

Make sure to remind your guests that the veil is not edible.  It may seem obvious but it is better to be cautious.

What are your tips and tricks?
Have you made these before?  There are many different ways to do it.  What are your tips and tricks? We would love to hear from you!


Perfect Diaper Cover Tutorial


Wanting to experiment with some new fabric, I came across a great tutorial for how to make diaper covers.  They are perfect for picture sessions or hot summer days (and nights). I thought I would share the link with you.  


Dana from "made" includes numerous pictures and thorough explanations. I tested the directions by whipping up a pair tonight for sparkle #2. Dana's tutorial has my stamp of approval!


Mary's Version

I added brown tulle ruffles to to the back for a little glitz.


Wednesday, March 2, 2011

Crazy Cute Baby's Hat


It is hard to get any shopping done when you are out with your baby.  There are the numerous fallen nuk retrievals followed by a quick sanitizing... and the switching of outfits due to a sudden outburst of one kind or another. However, I found most side-tracking came from the random stops of adoring strangers.

Don't expect the shopping to go any quicker with this hat on your little girlie. Be sure to allow extra time for all the "oohs" and "ahhs".

Materials:
Felted Sweater (Can be Substituted with Fleece, etc.)
Ribbon
Yarn
Thread
Needle
Scissors
Sewing Machine

Directions:
As you know, I love the look of felted sweaters and I have a stash already felted for projects such as these.  However, you can substitute in fleece or any other warm material.  I saw someone who had knit and sewn two (unused) dishcloths together for a similar hat.

Cut two 8" x 6" rectangles from your material.  If you are using a felted sweater, your edges won't unravel so you can cut from the bottom edge of the sweater but you do not have to.  With right sides together sew a 1/4" seam just as the picture below shows leaving 1" that is not sewn on either side.

Flip your piece right-side out and sew the two 1" sections.  Now your seams will not show when you flip up the cuff on the hat.  Go ahead, flip up that cuff!  

Now for the embellishments.  I used wool yarn to add a loose stitch around the top of the cuff not only to add some detail but to secure it in place.  Then, I attached two bows by hand-sewing them on each corner.  I also added little pieces of yarn with knots at the ends to add some extra pizazz.  

Almost There...
Thanks to each of you for following Mary's Makings!  We are almost up to a group of 20 people!  Hooray!  Remember, if you happen to be the person who refers the 20th person, you will receive the Boutique Barrette and they will receive the "thankful" scrabble decoration.

What do you want to see?  Please leave your comments  below!

Tuesday, March 1, 2011

Cuckoo for Tutus!


When I young, I remember how seriously I took my dancing as I wiggled and jumped in front of the dark glass on the oven, seeing my reflection.  Then at night, the windows became my mirror.  I believed that I was a world-class ballerina and people all around were clambering to see my secret performances.

Every little girl needs a tutu as they grand jete and sout de chat their tiny tushies around the house.  Here are easy instructions to make a dreamy tutu for your little one.

Materials:
3-6 Yards of Tulle (One or Multiple Colors)
Scissors
Elastic
Sewing Machine

Credit:
I need to give credit to the source of inspiration for these projects, so today's idea is brought to you by my neighbor and friend, Brianne.

Instructions:
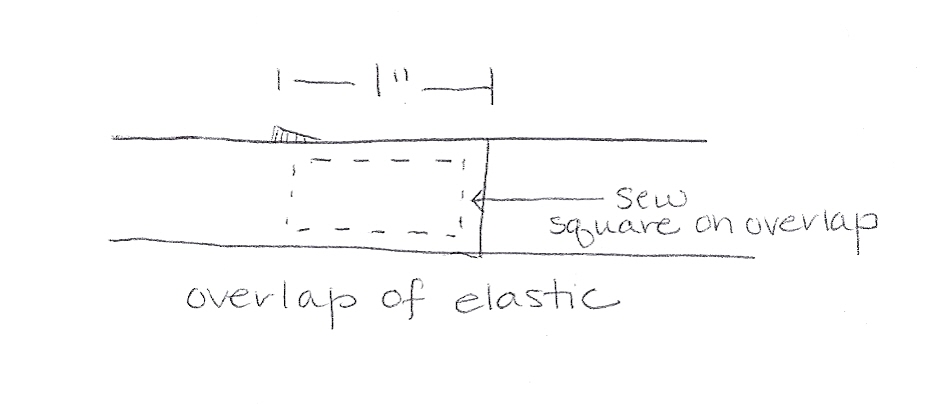
Measure the waist of your ballerina and add 2".  This is the length of the elastic you will need.  I used 1" wide elastic.  To secure the band together, overlap the elastic ends by 1".  Sew a square over this overlap as shown below.
If you would like a short ballerina skirt (which is a good length for little girls) cut along the fold of your tulle so you have two pieces.  For longer skirts, do not make this cut.  

You can cut long 3" strips with a scissor or rotary cutter.  But, here is a trick to make one quick, uniform snip for each strip.  Cut your tulle into 1 yard sections and roll them up.  With a yardstick as your guide, make a cut at every 3" mark.

Tie the strips to the elastic using whatever type of knot you prefer.  Just stay consistent.  When you have tulle knotted to cover all of the elastic, you are done.  

Let the leaps and twirls begin!